Brian White

+ Follow
since Jul 24, 2010
Merit badge: bb list bbv list
For More
Apples and Likes
Apples
Total received
In last 30 days
3
Forums and Threads

Recent posts by Brian White

Nancy Reading wrote:This is great Brian! Well done and thanks for sharing. I've actually got one of those rare (for me) periods where a solar cooker might actually be worth while.....
Can you share more of how your tracking system works? I didn't catch how the water flow is made to change with the sun direction, and quite how that moves the dish.

Oh, hi, Nancy and thank you. My tracking system is a bit strange. It relies on low pressure air gradually increasing.  A Chinese student has offered to help me do the photovoltaic thing to do it by motor.  But, I might see if I can convince him to have the photovoltaics  open and close an air valve instead, then it can turn on and off my waterwheel to move the solar cooker. (I just like the waterwheel because it is so low tech).  I checked the temperature below the cooking pot.  
2 days ago
This is a tracking solar cooker with a square dish just under 4 ft by 4 ft. It is made of 8 curved strips cut out of a 1/8 inch thick  4 by 8 sheet of ABS plastic.   When the strips are taped together they form a parabolic curve.   Why use strips? Well, the sticky material for making it reflective is "flat" (can only be curved in one direction or plane) but real parabolic dishes  are curved in 2 directions or planes,   so it is easy to stick them to the strips but not so easy to stick them to a real parabolic dish! You will end up making a lot of extra cuts if you use a true parabolic dish!   It isn't a perfect parabola and  it focuses to a ball of light that is about 6 inches wide.  (good enough for solar cooking).     The reason it is only part of a parabola is so the cooking pot can be independent of the dish.  This allows for easy access,  It's on "equatorial mount so  tracking of the sun is time based,  it goes at 15 degrees per hour and I reset it back to the morning position every evening.   I made a wood frame for it.  An aluminum frame would be perfect, lighter, more compact and more accurate  but I cannot weld anymore due to a medical condition, so wood it is for my proof of concept!

I bought rolls of special aluminum reflective tape from China to cover it and make it reflective. If you can't see your reflection in a material for a parabolic reflector, don't use it, because it has poor directional reflectivity.   Also, most "mylar" lets a lot of light through,  (some is even used on windows  to let you see out but others can't see in).   So, my advice is to get the Chinese rolls because they have thousands of parabolic solar cookers there that have to be resurfaced every year or 2,  so they probably know what they are doing.   So anyway, it works,  it's potentially 4 times as productive as last years attempt and I am happy with it so far, even though the weather has not co-operated.   The solar power is all focused on the bottom of a big pot (I use a 14 liter pot and another pot that is a bit smaller).    The next stage is to make a box cooker for it,  its going to be about 15 inches wide high and deep, and its going to have a tube with a lid on it at the front to soak up the heat from the parabolic.  The inside of the box will be made from  aluminum for flashing or roofing.   never made a box cooker before, so hopefully I can do it.   When I fried, I measured up to 230 centigrade on the bottom of the pot, so it can get plenty hot.  If I can get that in the box, then almost any type of oven cooking is possible. I attached some pictures but don't know how they will be displayed.    
2 days ago
Oh, Hi, Martin, It might be worth taking your Chinese parabola apart if its focal length is about 2 ft.  Thats the length from the bottom of the parabolic dish to the hot spot on if  the dish matches up to my drawing on the stadler  drawing board.  I think if it is taller than that,  it will be more difficult to do seasonal adjustment.
1 month ago
I won a prize for last years tracking solar cooking project on Instructables and this is the continuation of the project with a re-designed reflective dish.  Instead of going down a wrong route straight away, this time I made this little mini model and I'm going to just scale it up.  The full sized thing will have an approximately 16 sq ft reflector (1.4 sq meter) and should cook a lot quicker than last years model (because the heat will all be concentrated on the bottom of the cooking pot.  If anyone wants to do a school project,  I made the reflector from 3 dollar store plastic plates! And I just used technical drawing techniques to get all the figures and sizes of reflectors, etc.  I plan to build a box cooker over the hot spot and let heat in from the bottom, and have access for the cook at the back.  Also I want to use it as a solar drier to dry herbs and fruit.  In that case, I'm going to have a little solar powered fan blowing air past the hotspot and into the drier.    
1 month ago
I made the "pulser pump" which is a low tech way to pump water, on a little steam in Ireland.  It is a trompe and airlift pump combined.  My trompes and airlift pumps were much smaller scale than what was normal.  Commercial airlift pumps operate with high pressure air and the relative density of "water filled with bubbles" causes the pumping. My airlift pumps operate on plug flow (which has different physics).  It was used over about 15 years on the farm in Ireland to pump water for sheep and cattle. Things have changed and the little stream is much more often dry now so it doesn't work too often.     Now in the city of Victoria, I  use mini airlift pumps in my greenhouses and garden planters to circulate water to the plants.  It is automatic and runs from a little aquarium air pump, and the slightly compressed air is distributed through 3/8 inch aquarium tubing to currently 10 mini airlift pumps in my 2 greenhouses and in various places in my back garden. I have been doing this for over a decade.  If I had a stream or little river,  I would be compressing the air with a mini trompe.  Last year I did "low tech solar tracking" with a parabolic dish solar cooker.  It wasn't exactly parabolic because I didn't think my solar tracking would be accurate enough. (turns out it was a lot more accurate than I expected).    Anyway,  I had it working like a "2 bucket dripper tracker" earlier in the year before I converted it to waterwheel winch drive,  which was powered by an airlift pump!  This worked very well, and it had more torque than I expected too.   The next stage  (this year)  will be to make a proper parabolic dish, and get it on my mount,  for more accurate direction of the heat to one spot (this will make it cook much faster) and to start cooking amounts maybe 3 or 4 times the size.  I steam soil to put in the greenhouse without bringing in bugs and weed seeds. And I also steam the weeds and roots I pull up.  Cooked weeds rot way faster than weeds that aren't cooked,  plus they don't need to be composted, they can be used directly as mulch.   (I cook them in water, because it distributes the heat better and more evenly.)  I am hoping to use the waterwheel winch also to winch up and down night curtains in the greenhouse,  and maybe over plant rows too, but I have been lazy and haven't got round to it yet.  Heres a video about the solar cooker. Note that I am changing the dish shape quite a lot in the near future.  I will also get rid of the central axel in the next version and have the pot hanger separate from the dish entirely.  
4 months ago
I have chopped blackberry into a 5 gallon plastic can with a loppers and that worked out well. It composts really well and didn't survive and sprout.  This year I made "soup" with blackberry stems and leaves,  packed into a 7 liter pot and covered in water and then boiled in a solar cooker.  It makes good mulch and I used the rose scented soup water like compost tea.  When you boil the shoots, they rot way quicker than if you didn't boil them.  I hope to do this on a much bigger scale next year.  Brian
6 months ago
I was filling a planter with solar cooked soil but ran out half way,   so I filled the rest with uncooked soil.  I transplanted lettuce into the lot.  I expected a slightly cleaner crop in the solar cooked soil (no weeds) but it was also a deeper green and now after about 28 days, it is growing considerably faster too.   I can think of lots of reasons.  But is what it is,  a definite improvement in the first month.  Anyone else want to try it?   Here is a short video showing the difference.  
7 months ago
I have a tracking solar cooker project that made good progress this year.  Its experimental,  I'm trying to expand the reach of solar cooking so I don't cook food in it.
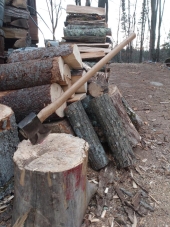
Instead, in a "play to get gardeners interested" I steam soil and I make weed soup instead of compost and compost tea.  

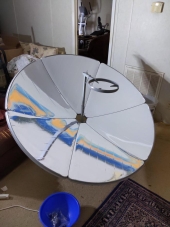
Because I didn't know how good my new tracking system would be,  I didn't go with a standard parabolic dish, instead going for something with a deeper curve, that doesn't concentrate the light as much, ( but the bonus is that it still concentrates well even if it isn't accurately aimed, plus it is less likely to hurt your eyes if it misses the target).

 My tracking system was bulky at the start,  now it's a lot smaller.  And the latest version is a bit "steam punk". Its mostly made of wood, and  It has  a miniwaterwheel that "winches" the solar reflector around!
There are no electronics outside.  It is all run on compressed air that comes from a pond air bubbler. It's a "time based tracker". The gradually increasing air pressure over the day in one pipe tells it where to point.    

So, results?  Are they good?
I steam soil in 7 liter batches,  it cooks or simmers  the whole day. 7 liters of soil with one liter of water added to prevent the soil burning.    I used it first to grow seedlings (no weeds) so they have no competition. They "seem" to do better.  The real test was accidental.  I was planning a planter with just solar cooked soil over a layer of solar cooked weeds.  BUT, I ran out of solar cooked soil half way.  So, I just used ordinary soil for the rest.  WHAT    A    DIFFERENCE!
(In fairness I transplanted lettuce into the non cooked soil one day later than into the solar cooked). In the solar cooked soil, the lettuce is significantly bigger and a darker green.  And there is an explanation.   The weed seeds, bulbs, stolons and tiny bugs, and bacteria have been cooked and they have released their juices into the soil.  New bacteria quickly colonized it and converted a lot of this stuff into plant food.  And the plants, without pathogens or soil insects eating their roots and making them sick, grew faster.
   
Weed soup is the 7 liter pot packed with chopped weeds, tamped down and water added to the top.  Put on the solar cooker,  and track for the day,  If it gets to about 80 C its good enough.  (Usually gets to over 90 and simmers most of the day if its sunny).     I use the soup water at about one in 20 in my watering can like compost tea.  Seems to have given my beans a big boost.  (It's carbohydrate and nutrients for the soil bacteria).  Probably helped the other plants too.   I have used the dry part of the cooked weeds mostly as mulch.  It rots down really fast,  and the worms seem to love it.  
Advantages?  I can use tomato clippings back on tomatoes, (because they are cooked).  Blackberry smells like strong rose perfume when it is cooked,  fennel smells great too, and even my mulch has a great scent when I put it on.  And instead of waiting 3 months to get the value out of compost,  I get the weed nutrients the very next day,  plus the carbohydrates can work right there in the soil to boost plant growth immediately, (instead of just doing rotting in the compost heap.   I am putting in a link to a playlist,  because it is a big project.  
The beauty of this system is that you reset it every evening,  and put the next batch on (if it wasn't cloudy all day)  and  you can safely ignore it all day till next evening.  Here is the playlist https://www.youtube.com/playlist?list=PLkzXlmAwZTZdwFHYgD8mp4RFg2-Ap-ZNy and here is one of the vids in case the playlist link doesn't work https://youtu.be/IKMkPy4kkTY
7 months ago
Hi, all,  I percolate water through a compost pile and I get a lot of compost tea.  It's probably great plant food but it is too alkaline. If I could lower the PH to between 6.5 and 7,  I could use it directly in hydroponics.   I used it last year to grow tomato plants in sand,  it did work but there were issues with yellowing veins etc. so there was definitely deficiencies due to it being too alkaline.   I know peat is acidic, but we are not supposed to use much because it comes from bogs.  Is there some other naturally acidic medium that I can use?  I started up the Tomatoes in sand again last week.   It's automatically watered with the compost tea.    Any suggestions for what to use as a buffer to avoid the deficiencies?  Thanks,  Brian in Victoria BC
9 months ago
Try to make it rodent proof and have plenty of ventilation.  I absolutely hated having rats eat my tomatoes, and then my tomatoes AND each other when I put in traps.  The newest greenhouse is 3 years rodent free so far,  so I am very happy. I have fine wire mesh over any opening windows and a sliding patio door to enter it.  I never leave that door open.
1 year ago


OSZAR »