• Post Reply Bookmark Topic Watch Topic
  • New Topic
permaculture forums growies critters building homesteading energy monies kitchen purity ungarbage community wilderness fiber arts art permaculture artisans regional education skip experiences global resources cider press projects digital market permies.com pie forums private forums all forums
this forum made possible by our volunteer staff, including ...
master stewards:
  • Carla Burke
  • Nancy Reading
  • r ranson
  • John F Dean
  • Pearl Sutton
  • paul wheaton
stewards:
  • Jay Angler
  • Anne Miller
  • Nicole Alderman
master gardeners:
  • Christopher Weeks
gardeners:
  • Maieshe Ljin
  • Benjamin Dinkel
  • Jeremy VanGelder

Small shake roof

 
steward
Posts: 1898
Location: Coastal Salish Sea area, British Columbia
1060
2
books chicken food preservation pig bike solar wood heat rocket stoves homestead ungarbage
  • Likes 5
  • Mark post as helpful
  • send pies
    Number of slices to send:
    Optional 'thank-you' note:
  • Quote
  • Report post to moderator
Hey everyone

so i wanted to build a cedar shake roof for a pig structure this year. I really had no idea what i was getting into and to be honest i found a lot of the information available online to be bleak. maybe this was just my searching ability, who knows. So anyways i wanted to post some simple pictures to give a better idea to people who would like to see how to split a shake and put on a cedar shake roof.

I want to state this is not the only way to install these and i am in no way a professional.


Pile-of-shakes-so-first-you-need-to-acquire-some-shake-bolts(-i-used-ones-which-were-around-24-).jpg
Pile of shakes so first you need to acquire some shake bolts( i used ones which were around 24 )
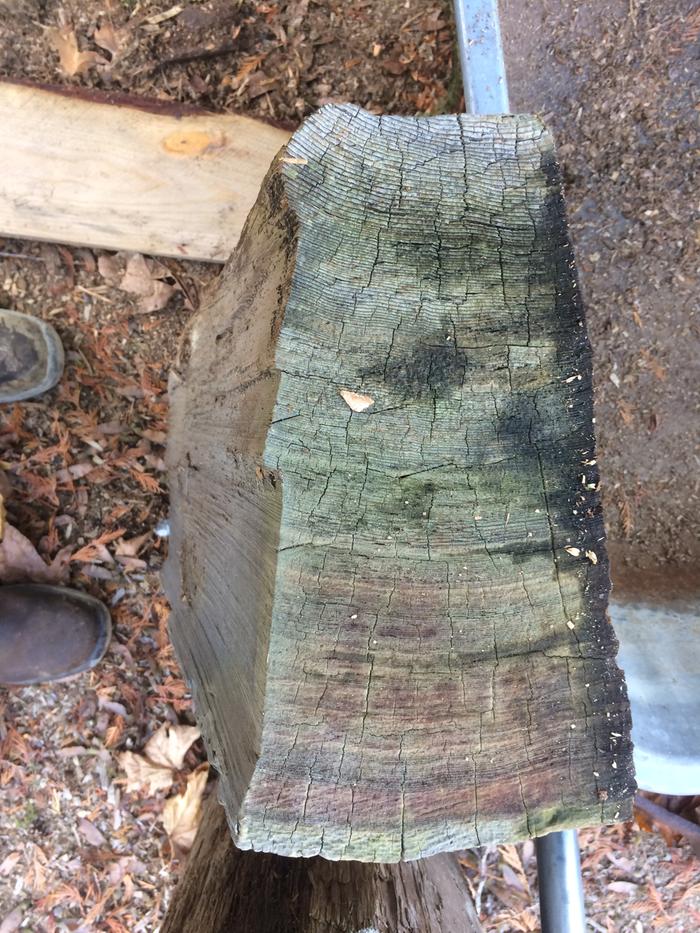
Picture-of-endgrain.-Than-you-need-to-check-out-the-end-grain-and-make-sure-you-are-using-quality-shakes.jpg
Picture of endgrain. Than you need to check out the end grain and make sure you are using quality shakes
picture-of-endgrain.-Than-you-need-to-check-out-the-end-grain-and-make-sure-you-are-using-quality-shakes.jpg
picture of endgrain. Than you need to check out the end grain and make sure you are using quality shakes
Next-you-need-to-acquire-a-froe-and-something-made-of-wood-to-hit-the-froe-with.-Froe-and-a-piece-of-heavy-Yew-wood-scavanged-from-the-beaches-near-victoria-ages-ago.jpg
Next you need to acquire a froe and something made of wood to hit the froe with. Froe and a piece of heavy Yew wood scavanged from the beaches near victoria ages ago
What-it-looks-like-to-hit-the-froe-some-people-hit-it-like-a-hammer-i-drop-it-on-to-the-froe.jpg
What it looks like to hit the froe, some people hit it like a hammer i drop it on to the froe
Here-are-some-photos-of-the-froe-going-into-the-bolts.-I-was-aiming-for-about-3-4.jpg
Here are some photos of the froe going into the bolts. I was aiming for about 3/4
Froe-going-into-the-wood.jpg
Froe going into the wood
Froe-all-the-way-in.jpg
Froe all the way in
Froe all the way in
Now-comes-the-prying-part.-push-the-bolt-away-from-you-as-you-pull-the-froe-handle-towards-you..jpg
Now comes the prying part. push the bolt away from you as you pull the froe handle towards you.
What-the-shake-looked-like.jpg
What the shake looked like
Here-is-a-shake-hammer-or-also-called-a-shingle-hatchet.-This-combines-2-tools-into-one.-You-can-also-use-a-hatchet-and-a-hammer.jpg
Here is a shake hammer or also called a shingle hatchet. This combines 2 tools into one. You can also use a hatchet and a hammer
IMG_0270.JPG
Shake Hammer
Shake Hammer
Cleaning-up-the-edges-of-the-shake-to-make-sure-it-has-a-new-surface-on-the-edges.jpg
Cleaning up the edges of the shake to make sure it has a new surface on the edges
turn-the-handle-downwards-and-than-pry-either-to-the-left-or-the-right-and-it-will-make-a-mostly-clean-break.jpg
turn the handle downwards and than pry either to the left or the right and it will make a mostly clean break
All-done-and-ready-for-the-roof.jpg
All done and ready for the roof
The-roof.jpg
The roof
The roof
IMG_0276.JPG
Installing the shakes
Laying-the-shakes..jpg
Laying the shakes.
Laying the shakes.
I-went-with-a-10-inch-exposure.-Meaning-the-1-x-4-wood-underneath-needs-to-be-spaced-10-inches-apart-on-centre.-Or-it-could-be-plywood-or-completly-solid..jpg
I went with a 10 inch exposure. Meaning the 1 x 4 wood underneath needs to be spaced 10 inches apart on centre. Or it could be plywood or completly solid.
Some-times-you-need-to-shape-and-adjust-the-shakes-to-make-the-more-secure-as-you-put-them-on(-think-less-wobbly).jpg
Some times you need to shape and adjust the shakes to make the more secure as you put them on( think less wobbly)
 
jordan barton
steward
Posts: 1898
Location: Coastal Salish Sea area, British Columbia
1060
2
books chicken food preservation pig bike solar wood heat rocket stoves homestead ungarbage
  • Mark post as helpful
  • send pies
    Number of slices to send:
    Optional 'thank-you' note:
  • Quote
  • Report post to moderator
continued from the post before

So all in all its been a really creative adventure. I got that pile of shakes off the beach here. it was an old log. I cut it up on the beach and brought it home in my car haha.

I really enjoy being able to work with cedar as its quite easy to work with. You also end up with a whole bunch of cedar kindling.
Also if there is ever a piece which is not straight on the edges, what i did was i ran it thru the table saw and cleaned it up and made it straight again.

I wanted to include a website which i found some of my information from. Note i did not use felt........
http://www.watkinsawmills.com/blog/2017/02/shake-shingle-roof-application-instructions
http://www.watkinsawmills.com/download_file/view_inline/191
Placing-a-smaller-piece-of-cedar-as-a-gap..jpg
Placing a smaller piece of cedar as a gap.
Because-of-the-smaller-piece-of-cedar-i-was-able-to-use-a-big-piece-of-shake-to-go-over-2-gaps-which-were-below..jpg
Because of the smaller piece of cedar i was able to use a big piece of shake to go over 2 gaps which were below.
 
pollinator
Posts: 3908
Location: Kent, UK - Zone 8
714
books composting toilet bee rocket stoves wood heat homestead
  • Mark post as helpful
  • send pies
    Number of slices to send:
    Optional 'thank-you' note:
  • Quote
  • Report post to moderator
Great project - really well done. I have done some cleaving, but not of shingles.

My understanding is that they are easier to cleave straight if you halve the block each time, rather than cleave thin shingles off the side, as you appear to be doing here. How did it work out for you that way?

 
Rocket Scientist
Posts: 1812
Location: Kaslo, BC
525
building solar woodworking rocket stoves wood heat greening the desert
  • Mark post as helpful
  • send pies
    Number of slices to send:
    Optional 'thank-you' note:
  • Quote
  • Report post to moderator
Hi Jordan,   Have done my fair share of shakes over the years and can say you did a good job of documenting it for others just starting out. One thing you could add is that if you want tapered shakes, alternate the ends with each split.
 
jordan barton
steward
Posts: 1898
Location: Coastal Salish Sea area, British Columbia
1060
2
books chicken food preservation pig bike solar wood heat rocket stoves homestead ungarbage
  • Mark post as helpful
  • send pies
    Number of slices to send:
    Optional 'thank-you' note:
  • Quote
  • Report post to moderator

Gerry Parent wrote:Hi Jordan,   Have done my fair share of shakes over the years and can say you did a good job of documenting it for others just starting out. One thing you could add is that if you want tapered shakes, alternate the ends with each split.


hey yes. i have this floating around in my head as i wasn't quite sure where to throw this information into the post. This is what i did with my shakes
 
jordan barton
steward
Posts: 1898
Location: Coastal Salish Sea area, British Columbia
1060
2
books chicken food preservation pig bike solar wood heat rocket stoves homestead ungarbage
  • Mark post as helpful
  • send pies
    Number of slices to send:
    Optional 'thank-you' note:
  • Quote
  • Report post to moderator

Michael Cox wrote:Great project - really well done. I have done some cleaving, but not of shingles.

My understanding is that they are easier to cleave straight if you halve the block each time, rather than cleave thin shingles off the side, as you appear to be doing here. How did it work out for you that way?


hey michael,
I am not sure i understand what you are mentioning.
So they would start out around 3/4" and than taper to a smaller size on the other end. and than i would flip the block over and continue again.

this part i am not sure i understand what it means
"My understanding is that they are easier to cleave straight if you halve the block each time,"
 
steward
Posts: 15771
Location: Northern WI (zone 4)
4975
7
hunting trees books food preservation solar woodworking
  • Mark post as helpful
  • send pies
    Number of slices to send:
    Optional 'thank-you' note:
  • Quote
  • Report post to moderator
Great post Jordan!  If you're interested in the free PEP program, you just completed a badge bit for Woodland Care.  Check out Cleave 6 shakes with a froe.  Just repost the pics it asks for in there and you'd get certified.  Nice work!
 
pollinator
Posts: 4958
1199
transportation duck trees rabbit tiny house chicken earthworks building woodworking
  • Mark post as helpful
  • send pies
    Number of slices to send:
    Optional 'thank-you' note:
  • Quote
  • Report post to moderator

jordan barton wrote:

Michael Cox wrote:Great project - really well done. I have done some cleaving, but not of shingles.

My understanding is that they are easier to cleave straight if you halve the block each time, rather than cleave thin shingles off the side, as you appear to be doing here. How did it work out for you that way?


hey michael,
I am not sure i understand what you are mentioning.
So they would start out around 3/4" and than taper to a smaller size on the other end. and than i would flip the block over and continue again.

this part i am not sure i understand what it means
"My understanding is that they are easier to cleave straight if you halve the block each time,"


This does not make sense to me either. When you split, it will follow the grain so it will never be tapered, and besides; that is not shakes, that is shingles.

To make shingles it either takes a saw to saw across the grain, or to do so by hand, you have to use a drawknife and whittle down one end in a taper.

If i had to advocate for shakes or shingles, it would be shakes because while more rustic looking, they last longer. because a shake is not cutting into the grain, no water is being sucked in like a shingle, so shakes shed water better, and thus last longer, not to mention just being thicker.
 
Michael Cox
pollinator
Posts: 3908
Location: Kent, UK - Zone 8
714
books composting toilet bee rocket stoves wood heat homestead
  • Likes 1
  • Mark post as helpful
  • send pies
    Number of slices to send:
    Optional 'thank-you' note:
  • Quote
  • Report post to moderator
Perhaps I wasn't clear in my post. I'm not describing a sawn board, but split as you have documented above. Here in the UK the tradition is to do this with oak or chestnut.

Blocks are split radially with the froe into billets as you are working with. Each billet is split in half, then half again etc... until you are left with shakes/shingles of the desired thickness. From your pictures you seem to be splitting thin pieces from a large block. If I tried that with oak or chestnut, the split would run out and not split cleanly through the block. This happens when the two halves are different thicknesses.
 
Mike Haasl
steward
Posts: 15771
Location: Northern WI (zone 4)
4975
7
hunting trees books food preservation solar woodworking
  • Likes 1
  • Mark post as helpful
  • send pies
    Number of slices to send:
    Optional 'thank-you' note:
  • Quote
  • Report post to moderator

jordan barton wrote:

Michael Cox wrote:
My understanding is that they are easier to cleave straight if you halve the block each time, rather than cleave thin shingles off the side, as you appear to be doing here. How did it work out for you that way?


hey michael,
I am not sure i understand what you are mentioning.
So they would start out around 3/4" and than taper to a smaller size on the other end. and than i would flip the block over and continue again.

this part i am not sure i understand what it means
"My understanding is that they are easier to cleave straight if you halve the block each time,"


I think Michael is saying that if you have a block of wood (or a round that you've halved), if you keep splitting shakes off of one side in the same direction, they can possibly get thicker or thinner as you work the froe down through each split.  So after doing 10 of them, they may all be thicker (or thinner) at the bottom end.  By the time you get through the block you end up with plenty of wood left at the top of the block but the bottom of the block has all been turned into shingles.

So the remedy is to split a 12" block into two 6" blocks.  Then into four 3" blocks.  Then into eight 1.5" blocks.  Then into sixteen 3/4" shakes.

I've heard a similar thing.  I think if you push or pull the froe as you split down through the block you can control or mitigate this phenomenon.  So he's probably asking if you ended up with unintentional taper and if this might be a solution.  I think.  If I'm following the conversation.

Edit:  Michael and I were typing at the same time.  
 
Michael Cox
pollinator
Posts: 3908
Location: Kent, UK - Zone 8
714
books composting toilet bee rocket stoves wood heat homestead
  • Mark post as helpful
  • send pies
    Number of slices to send:
    Optional 'thank-you' note:
  • Quote
  • Report post to moderator
Cross posting!

Worse than that; it doesn't just get thicker or thinner. Frequently the shingle will split right out leaving you with an unusable short piece. If they are equal, or nearly equal, thickness you can use the froe and some pressure to direct the split.
 
jordan barton
steward
Posts: 1898
Location: Coastal Salish Sea area, British Columbia
1060
2
books chicken food preservation pig bike solar wood heat rocket stoves homestead ungarbage
  • Likes 1
  • Mark post as helpful
  • send pies
    Number of slices to send:
    Optional 'thank-you' note:
  • Quote
  • Report post to moderator
so yes i was splitting them so they had a taper on the end. The smaller end would be placed towards the peak of the roof. with the "butt" being placed on the down side where it will be exposed to the elements.  In order to get this taper on cedar you need to keep flipping the bolt over, otherwise you end up with thick piece on either end.
The way i am doing it means that the top of the shake gets covers 3 times if i am correct i would have to go check for sure.

this is what i have distilled from the reading i have done. so do not take it as gospel.

I imagine it is different with oak or chestnut.
 
Travis Johnson
pollinator
Posts: 4958
1199
transportation duck trees rabbit tiny house chicken earthworks building woodworking
  • Mark post as helpful
  • send pies
    Number of slices to send:
    Optional 'thank-you' note:
  • Quote
  • Report post to moderator
I have been shingling the side of my house in anticipation of winter, and thought I might mention how a Shingle Hammer is indispensable for this kind of project. It helps to have a super sharp hatchet end, but it really saves a lot of steps as you can narrow a shingle/shake, trim the ends, pull nails, make the right reveal, and of course pound home the nails if you are using hand pounders.
 
pollinator
Posts: 5568
Location: Bendigo , Australia
498
plumbing earthworks bee building homestead greening the desert
  • Mark post as helpful
  • send pies
    Number of slices to send:
    Optional 'thank-you' note:
  • Quote
  • Report post to moderator
A great story
 
Another marshmallow on fire. No more for you tiny ad.
build a better world instead of being angry at bad guys
https://greenlivingbook.com
reply
    Bookmark Topic Watch Topic
  • New Topic
OSZAR »